Beginner’s Guide to Your First Vlogging Camera Setup
If you are just starting to film your life, it is normal to feel a bit lost when people suggest buying a dedicated vlogging camera. Your phone is always in your pocket and feels simple enough, so why add another device? The truth is that a beginner does not need a complicated professional rig. What you really need is a first vlogging camera setup that makes recording easier, not harder. When the gear is light, clear to use, and ready whenever you have an idea, you stop worrying about buttons and start paying attention to your stories, your friends, and the small details that make your day worth sharing. In that moment the vlogging camera turns into a small partner you reach for without thinking, just like your keys or wallet.
Clarify what you want from your first setup
Before you open any review site or product page, spend a little time with yourself and your goals. Ask why you even want a vlogging camera in the first place. Do you imagine daily lifestyle videos, travel diaries, or quiet sit down talks in your room? Each style pushes your setup in a slightly different direction. If you want to share relaxed chats at a desk, a small tripod, simple lighting, and a dependable vlogging camera are more important than advanced slow motion. If you plan to roam streets or campuses, you might care more about a light body, quick autofocus, and a battery that survives a long day out.
It can help to describe one or two dream videos in a notebook. Write down where you are, who is around you, and how long you would actually record in each location. When you see your ideas in words, it becomes clear whether you need a weather sealed vlogging camera, a strong microphone, or simply something that is easy to throw in a small bag. This step feels basic, but it protects you from buying gear because someone else likes it rather than because it truly matches your own creative plans.
Choose a vlogging camera body that fits your lifestyle
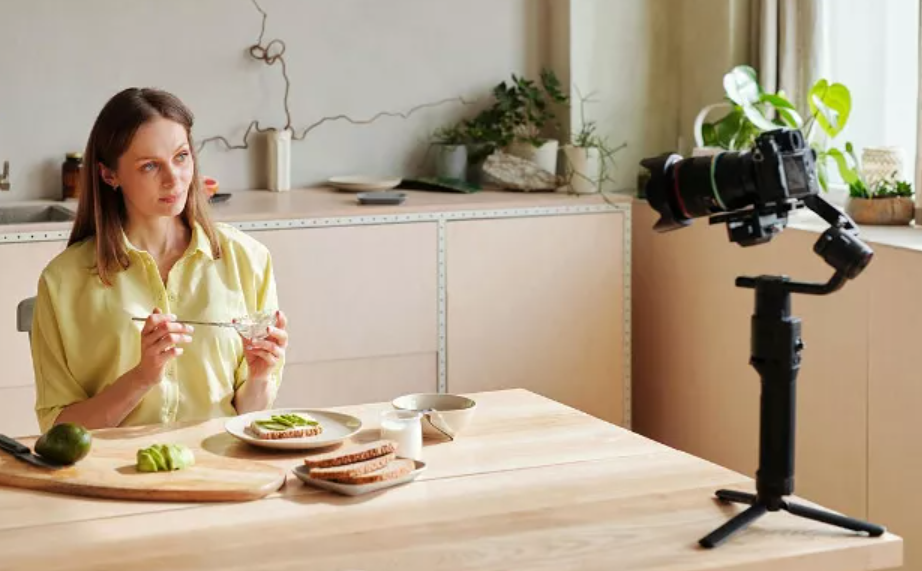
Once you have a sense of your goals, you can look at camera bodies with a calmer mind. For a first vlogging camera, you rarely need the newest flagship. What matters more is how the body feels in your hand, how easily it fits in your bag, and whether the controls make sense when you are a bit tired or nervous on camera. A side flip screen is extremely helpful for beginners, because you can quickly check your framing and see if the vlogging camera is actually recording before you start talking.
Pay attention to a few key features instead of every line on the spec sheet. Reliable face and eye autofocus will save countless clips, especially when you hold the vlogging camera at arm’s length. Solid stabilization, whether in the body or lens, makes walking shots much more comfortable to watch. Think about power too. A camera that charges over USB or runs from a power bank is easier to keep alive than one that depends on a large external charger. When you imagine a normal filming day, the best vlogging camera body is the one that lets you move through it with the least friction.
Pick a lens that works for vlogging
The body gets a lot of attention, but the lens is what actually shapes the way your videos look and feel. For a first vlogging camera setup, most people are happiest with a moderate wide angle lens, something that shows your surroundings without warping your face. If the lens is too tight, you have to hold the vlogging camera uncomfortably far from your body. If it is too wide, your nose and forehead can look stretched in close up shots. A simple zoom that starts fairly wide or a fixed prime in a natural range is more than enough for most beginners.
Focal length and how much you see
When you hear people talk about focal length, they are really talking about how much of the scene the lens lets your vlogging camera capture. A shorter focal length means a wider view, so you can show your room, a street, or a café table even when the camera is close to you. This is why so many vloggers like lenses in the wide to slightly wide range. At the same time, going extremely wide can make backgrounds feel distant and can exaggerate features if you get very close. As a beginner, it is usually safer to choose a focal length that looks natural to your eye when you play back the footage.
Aperture and the look of your background
Aperture controls how much light reaches the sensor and how blurry the background appears. Lenses with a wider maximum aperture let your vlogging camera see more in darker spaces, which helps when you shoot at home in the evening or in small restaurants. They also create a softer background that separates you from your surroundings. This can make your videos feel more focused and cinematic. However, very shallow depth of field can also make it harder to keep your eyes in focus if you move a lot. For your first vlogging camera lens, a moderate aperture that balances light and focus often feels easier to live with.
Build simple, reliable audio for your vlogs
Many beginners spend all their time picking a vlogging camera body and lens, then forget that viewers care strongly about sound. People will tolerate a slightly soft image, but they quickly leave when audio is harsh, echoing, or buried in background noise. Check that your chosen vlogging camera has a microphone input and a sensible place to mount a small shotgun or wireless receiver. Even a basic external mic can make your voice clearer and reduce the hiss and echo that phone microphones often capture in bedrooms and kitchens.
When planning your first setup, think about where you will usually talk. If you mainly record indoors, a small directional mic on top of the vlogging camera may be enough, as long as you stay close. If you want to walk through parks or markets while talking, a wireless lavalier can keep your voice clean even when the camera is at a distance. You do not need a studio, but you do need a repeatable solution. Once your audio is sorted, editing becomes calmer because you are no longer fighting to fix every sentence.
See also: The Importance of Cybersecurity for Growing Tech Businesses
Add support gear that makes filming easier
After you have the vlogging camera, lens, and basic audio, a few simple accessories can make your life much easier. A small but stable tripod or handheld grip lets you set the camera down for talking shots, cooking demos, or desk work. Extra batteries and memory cards remove the constant fear of running out of power or space at the worst moment. A soft cleaning cloth and case keep your vlogging camera safe when you toss it into a backpack before class or work.
Lighting is another gentle upgrade that helps almost every beginner. You do not need heavy stands or complex setups. A compact LED panel you can angle near your face will already help your vlogging camera show clearer skin tones and reduce deep shadows under the eyes. Whenever possible, combine this with natural light from a window. Learning to move yourself and your camera closer to good light costs nothing, but it may do more for your image than any expensive feature.
Build habits to get the most from your first vlogging camera
The final part of a beginner’s guide is not about gear at all, but about how you use it. Once your vlogging camera setup is ready, take time to practice simple routines. Charge batteries the night before you plan to film. Keep your main lens on the camera so it is ready to grab. Create a small checklist in your notes app for focus mode, frame rate, and audio levels, and glance at it before each session. These small habits turn a pile of equipment into a dependable tool.
Most importantly, use your vlogging camera often, even on days when you are not posting. Record short test clips, try new angles in familiar places, and listen back to your sound. The more relaxed you feel with the buttons and menus, the more attention you can give to what you want to say. Over time you will discover which parts of your setup deserve a future upgrade and which parts already work well. That awareness is the real gift of your first vlogging camera kit: it teaches you how you like to create, so every next decision becomes easier.